Showing posts with label crunchbang. Show all posts

Thursday, December 17, 2009

Performance gains in chair, not in computer

I've been utilizing Crunchbang's keyboard shortcut ability (any distro should have this ability), and I am convinced that it has sped up the way I use my laptop more than any performance enhancement I've ever done. 

It makes so much sense; I don't know why I didn't start using keyboard shortcuts sooner.  I probably just figured that it would be too much trouble to set up and then try to remember what keys launch which applications, but I generally only run a handful of applications, things such as Firefox, PCManFM, Liferea, and Zim, so there really isn't that much mental overhead.

If you're worried about overhead, consider what you are going through when lauching an application without keyboard shortcuts:
  1. Place hand on mouse
  2. Move mouse to menu and click on it
  3. Find the appropriate sub-menu (in most cases)
  4. Navigate to the appropriate sub-menu and click
  5. Repeat steps 3 and 4 until the actual application launcher is reached
  6. Click the item
  7. Wait for the application to launch
  8. Decide whether you want to use the keyboard or mouse
  9. Return your hand to the keyboard or move it to the mouse as appropriate

That is an aweful lot of mental and physical overhead, when you could just do a Super-W to launch Firefox.  Life is too short to go through all that work every time I need to launch an application, especially now that I've been able to recommision my CapsLock key to be my Super key.

After switching, I had no idea what a difference it made until a few days later when I noticed that it seemed like my laptop was actually running faster, because I was getting more work done in less time.  Back when I was working on a Help Desk, the other technicians and I used to describe a phone call that turned out to be user error as a "picnic"; Problem In Chair, Not In Computer.  I never thought that I would actually speed up my computer by making a change to the person sitting in the chair rather than making the change in the computer, but I guess it shouldn't surprise me after all those years of solving computer problems by changing people rather than computers.

So don't just sit there, go make the most of your time on the computer and start using keyboard shortcuts!

Sunday, November 29, 2009

Transforming Caps Lock into the Super key

Crunchbang has a lot of great keyboard shortcuts configured by default, e.g. Super+W launches Firefox, Super+T launches the Terminal, and Super+F launches PCManFM, the greatest file manager ever.  I love the idea of using keyboard shortcuts to get stuff done faster but I think it is unfortunate that in Crunchbang they are paired with the Super key (a.k.a the "Windows" key).  There are still a few keyboards that don't have a Super key and on my Dell Inspiron 5100, it is located way out in the middle of nowhere above the Backspace key.

I have a few options to fix this, the most obvious being that I could go into my rc.xml file, which contains the key mappings, and change the paired key from Super to something else, like Ctrl, Shift, or Alt.  I was hesitant to do that for obvious reasons: I didn't want to lose the functionality currently provided by those keys.  So I decided to keep the keyboard shortcuts paired with Super but remap my Super key to Caps Lock to make it easier to get to.

Enter xmodmap.  Xmodmap is the Linux keyboard mapping tool and is probably part of every distribution.  Xmodmap is one of those tools that can do just about anything but it can be a little tricky to learn.  I started my quest with this fantastic tutorial, and ended up with a file called .Xmodmap in my home directory (i.e. /home/jizldrangs/.Xmodmap) that contained the following:

     keycode 66 = Super_L
     keycode 133 = Caps_Lock

According to the tutorial that should have worked, and it probably would have if I were trying to switch N and W, but as it turns out these utility keys, such as Super, Ctrl, Alt, and even Shift, require special steps because they are "modifiers".  To make a long story less long, here is what I ended up with in my .Xmodmap:

     clear lock
     add mod4 = Caps_Lock

After rebooting I have exactly what I wanted: Caps Lock is converted over to Super and doesn't turn on the Caps Lock or capitalize anything anymore.

Saturday, November 14, 2009

Hulu quest, Part 3: Crunchbang

In my quest for Flash that could handle Hulu videos, I started distro hopping and settled on Crunchbang 9.04. I've used Crunchbang before; it is basically a slimmed-down customization of Ubuntu, with all the bloat removed. Gnome and all of its various supporting applications such as Nautilus and Evolution have been stripped out and replaced with Openbox, a lightweight window manager and such applications as PCManFM, the lightening-fast file manager, Claws mail, Terminator, the terminal emulator, and a lot of the usual suspects like Firefox, Rhythmbox, VLC, AbiWord and Gnumeric, and Pidgin. It even comes with a few things that Ubuntu doesn't come with by default, such as Skype, MP3 and DVD playback capabilities, and our friend, the Adobe Flash plugin.

Crunchbang, like Ubuntu, automatically installed the drivers for my wireless card and I was back on the internet within minutes of completing the installation. I can't tell you what a relief it was to have wireless back after a few days of sitting in the corner of Mrs. Jizldrangs' office, tethered to the router with a LAN cable!

To make a long story short, I never did get Flash to where I could use Hulu. I tried a bunch of stuff after getting Crunchbang set up, such as installing libgl-mesa-dev, and after that didn't work I installed Hulu Desktop and that was pretty terrible.

The closest thing I had to success was when I went directly to Adobe's website and downloaded their Flash plugin for Linux. The version up there at the time of this posting is 10.0.32.18, and it didn't exactly give me smooth Hulu shows but the shows were the smoothest yet. You can get it by going to the Adobe's Flash Player Download Center, dropping down the menu at the bottom and selecting ".deb for Ubuntu 8.04+", then hitting "Agree and Install Now". That will download the package to your desktop. When it is finished you will have to install it using:

$ sudo dpkg -i /path-to-deb-package/install_flash_player_10_linux.deb

When I did that I received an error that there were 2 dependencies, libnspr4-dev and libnss3-dev that were not installed, so I did:

$ sudo apt-get install libnspr4-dev libnss3-dev

It took about 15 seconds to install those libraries, after which I reran the dpkg command above and I was in business (or, at least, as "in business" as I was going to get, considering that Hulu still wasn't watchable). If you do this, watch out for the update manager as it will try to "update" your flash player to the worse one in the repos.

So I spent several days distro hopping to get this working and came up empty-handed. I really don't understand why this is so difficult; I realize that this is an older laptop but it has been playing full-screen DVDs since Mrs. Jizldrangs bought it for grad school way back in 2003. It has a lot more memory now than it did back then, so it seems like it should definitely be able to handle these lower-quality videos on the web. On the other hand, my desktop, which is a quad-core machine with more RAM and a much newer graphics card, handles Flash just fine, so I guess that either my laptop doesn't have the resources or the hardware is not adequately supported under Linux (it has an ATI Radeon Mobility 7500, and I've seen several forum posts saying that ATI, now AMD, is dropping support for it after a certain version of Xorg; that angle may be worth chasing down).

Hopefully some of my future posts will be about how I was actually sucessfull in getting stuff to work...

Thursday, November 12, 2009

Update Notifications in Crunchbang

I've been running Crunchbang for just over a week now and I'm loving it. The slimmed-down, speedy configuration suits me perfectly.

There is one thing that we took for granted in Ubuntu that is sadly lacking in Crunchbang: update notifications. When updates are available in Ubuntu, you get an icon in the system tray or a window that pops up informing you that it is time to update. In Crunchbang, you're on your own when it comes to knowing when, or even remembering, to update.

Fortunately you've all met my personal Linux butler, Cron, and this is a perfect job for him. We could just have "apt-get update; apt-get upgrade" run every day, and all updated packages would be downloaded and installed without you having to lift a finger. I'm sure this will be the way many people prefer to do things, but I like to have a little more control than that. I like to have the final say as to what software is installed on my computer, so I would rather be notified when updates are available.

To accomplish this I am going to set up 2 cron jobs: one for the root account and one for my user account. In a terminal, run "sudo crontab -e" and enter the following line:

45 * * * * apt-get update; apt-get -s upgrade | grep -c ^Inst > /var/cache/apt/number-of-updates

This line runs every hour on the 45s and updates the apt-get database, then it does an upgrade with the -s option, which "simulates" the upgrade, meaning that it doesn't actually do the upgrade but it displays the text as though it did. This text is piped through grep, which searches for the "Inst" string at the beginning of the line (which indicates that a package is to be installed by the upgrade). The -c option tells grep to output the number of matches, which is stored in the text file located at /var/cache/apt.

Don't forget to create the text file and give all users read permissions to it:

sudo touch /var/cache/apt/number-0f-updates
sudo chmod 644 /var/cache/apt/number-of-updates

Thus far we have a way of getting the number of updates available saved to a text file. Now we need to display the number using the dbus notification system. This is going to require several lines of bash commands, so we will need to create a script to call from cron. Open a new text file and insert the following into it:

#! /bin/sh

NumOfUpdates=$( cat /var/cache/apt/number-of-updates )

if [ $NumOfUpdates != "0" ]; then
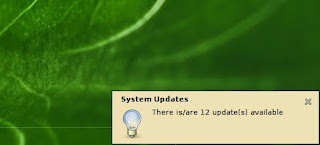
notify-send -u normal -t 5000 -i info "System Updates" "There is/are ${NumOfUpdates} update(s) available"
fi

This short bash script reads the number of available updates from the file specified above, and if the number is not 0, it uses notify-send to display a notification in the corner of your screen for 5 seconds. Go ahead and run it using "sh file-name" if you want to see the notification (note: notify-send is installed by default on Crunchbang but it wasn't installed by default in Ubuntu last time I checked; you will have to install the package bnotify-bin" if it isn't already installed).

Save it somewhere you will remember. Now go into your own cron config file by typing "crontab -e" and enter the following:

30 * * * * sh /path-to-your-script/script-file-name

If we were to save this change, cron would not be able to display the notification. That's because cron does not have a handle to the current display, so when notify-send tries to display the notification, it doesn't have a display to show it on and the notification is lost in the ether. This is easy to fix by making sure we set the appropriate environment variables before saving the crontab file. At the top of the crontab file, insert the following:

USER=yourr-user-name
HOME=/home/your-user-name
SHELL=/bin/sh
DISPLAY=:0.0
MAILTO=your-user-name
PATH=/sbin:/bin:/usr/sbin:/usr/bin:/home/your-user-name/bin

There is a chance that not all of these variables are actually used, but I like to include them anyway; there's no reason not to. As an example, here is the entire contents of my crontab file:

USER=jizldrangs
HOME=/home/jizldrangs
SHELL=/bin/sh
DISPLAY=:0.0
MAILTO=jizldrangs
PATH=/sbin:/bin:/usr/sbin:/usr/bin:/home/jizldrangs/bin

# m h dom mon dow command
30 * * * * sh /home/jizldrangs/bin/notify-updates

Save your crontab file and you're done! Now whenever updates are available you will get a notification in the corner of your screen that looks something like this:


Wednesday, November 11, 2009

How I finally got my Samba share mounted under Crunchbang

I've been running Crunchbang 9.04 for a little less than a week and although almost everything has worked like a charm so far, I had a heck of a time getting my Samba share to mount. Crunchbang does not come with Nautilus installed; it comes with PCManFM, which is very fast and I love using it normally, but it is totally unable to mount Samba shares like Nautilus can.

There are a wide vareity of tools available under Linux that will connect to a Samba share, most of which don't actually mount the share, instead connecting over the smb protocol (you have probabably seen "smb://" in the address bar of Nautilus or Konquerer at some point; that's why). I could have tried something like that but actually mounting the drive seemed like the way to go on Crunchbang, since that way any file manager would be able to browse it, and the Samba mounting utilities have been part of Linux forever, so they should work pretty well under any distro, right? I've used "mount -t smbfs", "mount -t cifs", "mount.smb", "mount.cifs" in other distros with no problems, but for some reason on Crunchbang each time I got various error messages that I didn't record.

I spent several days Googling and trying out various alternative options like fusesmb, smbnetfs, and gigolo. Fusesmb and smbnetfs are supposed to be userspace apps where you give it a directory and it sets up all of the shares on your local network inside that directory. It seemed great; I didn't even need root permissions! Filled with hope, I ran "smbnetfs ~/network" and then browsed into the "network" folder, only to find my wife's Windows laptop listed but not the Samba share I'm trying to get to. It was insanely frustrating and I almost gave up and went back to Ubuntu.

To make a long story short, I eventually got it working in 3 steps:
  1. I installed smbfs, which is not included in Crunchbang by default, by running "sudo apt-get install smbfs"
  2. I created a new directory to mount my samba share by running "mkdir ~/smbshare"
  3. I mounted the share inside the new directory by running "sudo mount.cifs //ServerIPAddress/jizldrangs ~/smbshare -o username=jizldrangs, password=mypassword".
Concerning Step #3, you may be thinking what I thought: "I don't want to type in my password into the line because it will be displayed on the screen; I'll just run the base command without the options and wait for it to prompt me for a password." Hold on there, hotshot, you are about to subject yourself to the same several hours of frustration that I subjected myself to. You have to put the username and password into the command the way I specified above; I read somewhere that there is a bug with the mount command when used with smbfs such that it won't work unless you actually type you username and password into the command. Major bummer, huh?

I only needed to do this once, so it worked out just fine for me, but if you have to do this a lot, or want to script it and don't feel comfortable storing your password in a script, you can also do the following:
  1. Create a new text file containing the username and password in the format specified above except on separate lines (i.e. put "username=yourUserName" on the first line and "password=yourPassword" on the second line).
  2. Save it somewhere out-of-the-way.
  3. Change the owner to root by running, "sudo chown root /path-to-file/file-name"
  4. Remove all permissions except read and write by the owner (which we just set to root) by running "sudo chmod 600 /path-to-file/file-name". This will ensure that only the root user can read the file containing your credentials.
  5. Modify the mount command above to, "sudo mount.cifs //ServerIPAddresss/share-name /path-to-mount-directory/mount-directory-name -o credentials=/path-to-file/file-name"
HTH!