I just rebuilt my old Slackware 11 machine into a shiny, new Ubuntu Server 10.10 (maverick) machine. Wireless printing was the most important function of my old server, so I had to get it working on the new server.
The LaserJet 1018 uses the foo2zjs driver, which works great when installed from the repos (I believe it is part of the default installation so there is no new package to install), however the 1018 requires the computer to provide the firmware. Here is how to do that:
First, get the firmware on your machine. Run:
wget http://foo2zjs.rkkda.com/firmware/sihp1018.tar.gz
Then unpack it, and run a utility to convert the image to a firmware file:
tar zxf sihp1018.tar.gz
arm2hpdl sihp1018.img > sihp1018.dl
Copy it to your /usr directory for safe keeping:
sudo cp sihp1018.dl /usr/share/foo2zjs/firmware/
Run the following to move the firmware to the printer:
cat sihp1018.dl > /dev/usb/lp0
That's it, you should be able to print! Of course, your printer will only hold on to the firmware as long as the printer is powered up; when the printer loses power, it will lose the firmware as well. You don't want to have to run this command every time; instead you should be pushing the task off onto udev by creating a new rule! Cd into /etc/udev/rules.d, create a new file called 80-printing.rules, and put the following inside:
ACTION=="add", ATTRS{idVendor}=="03f0", ATTRS{idProduct}=="4117", RUN+="cat /usr/share/foo2zjs/firmware/sihp1018.dl > /dev/usb/lp0"
Save and close the file, then restart udev by running:
sudo service udev restart
And you should be good to go! A big shout-out goes out to the folks on this Ubuntu Forums thread, who filled in the gaps of my knowledge. :)
Saturday, January 15, 2011

Tuesday, June 22, 2010
Whole-disk encryption on Ubuntu
I've had my wife's laptop running whole-disk encryption with TrueCrypt for a couple of years now, and I always wanted to get that level of security on my Ubuntu machine. It really makes a lot of sense for the laptops to have as much privacy protection as possible, since we travel with them and therefore they are at higher risk of being stolen. This week I finally got the opportunity to try it out.
The Plan
I knew I was going to take a performance hit, so I got myself an 8 gig SD card. The root of my Ubuntu installation would go on it, with an unencrypted /boot partition on the hard drive as well as a 60 gig encrypted /home partition to store all of my files. The home partition needs its own encryption key, so I decided on a key file that would be stored on the already encrypted root parition, allowing the OS to automatically unlock the home parition and mount it at boot time.
Installation
I downloaded the Ubuntu Alternate Install disk, since the standard install does not include the option to install logical volumes, which are necessary for thinks like encryption or software RAID. The installation process was somewhat involved as you need to manually configure your partitions. There's simply no way around it as your /boot directory needs to be unencrypted (this is because the software that performs on-the-fly encryption and decryption is a kernel module, and it can't be started if it is encrypted). I tried to configure my /home partition on the 60 gig partition on the hard drive like I wanted, but I kept running into weird problems with the installer so I decided to take my chances installing /home on the SD card with everything else and seeing if I could set up /home on the 60 gig encrypted partition later.
So I ended up with /boot on an unencrypted partition on the hard drive, my swap space on an encrypted partition on the hard drive, and the root directory with everything else (/etc, /usr, /bin, /home, etc) on the encrypted partition on the SD card.
Configuration of the /home partition on the hard drive
Less than 8 gigs of space was just not going to cut it for my /home partition, so I was anxious to get the 60 gig encrypted parition configured.
After much Googling, I learned that encrypted volumes in Linux are configured on logical volumes. This means creating a physical parition, configuring it as a physical volume, adding it to a volumne group, creating a logical volume inside the group, and finally installing a file system inside the logical volume, but fortunately a handy program called cryptsetup takes care of most of that for you. Encrypted volumes use LUKS, the Linux Unified Key Setup along with dm-crypt. One of the nice things about LUKS is that it contains 8 key "slots", meaning that you can have up to 8 passphrases or key files, any of which will unlock the volume. This allows me to have a backup passphrase in case I need to reinstall the operating system or the key file goes corrupt.
So I formatted the 60 gig parition with ext4, and then I ran the following to initialize it as a physical volume for use as a logical volume, giving it the name pvHomeDir:
$ sudo pvcreate /dev/sda7 pvHomeDir
Then I create a volume group called vgHomeDir and added that volume:
$ sudo vgcreate vgHomeDir /dev/sda7
I then ran the following line to create an encrypted volume in that virtual group:
$ sudo cryptsetup -y --cipher aes-cbc-essiv:sha256 --key-size 256 luksFormat /dev/sda7
It asked me for a passphrase, which I supplied. When it was finished, I unlocked the new encrypted partition with:
$ sudo cryptsetup luksOpen /dev/sda7 pvHomeDir
I then created a 60 gig logical volume called lvHomeDir in the encrypted parition with this:
$ sudo lvcreate -n lvHomeDir -L 60G vgHomeDir
Then I installed an ext4 file system in the new logical volume (note the name and location of the volume; it is located in /dev/mapper and has the name of the volume group prepended with a dash to the name I gave it):
$ sudo mkfs.ext4 /dev/mapper/vgHomeDir-lvHomeDir
OK, at this point the drive is all set up but it needs that key file so that I don't have to enter in two passphrases every time my computer boots. I create a folder under /usr called keyfile, and copy a picture of myself and my daughter into it, and rename it "file". To add the file as a key to the new partition I ran the following (I'm pretty sure this is the command but not 100%; I'm sorry if it is wrong and please post a comment if this line needs correcting):
$ sudo cryptsetup luksAddKey --key-file=/usr/keyfile/file /dev/sda7
Almost done! The partition just needs to be configured so that it will be used for my /home directory. I edited 2 files:
1. In /etc/crypttab I entered:
pvHomeDir /dev/sda7 /usr/keyfile/file luks,retry=1,lvm=vgHomeDir
2. In /etc/fstab I entered:
/dev/mapper/vgHomeDir-lvHomeDir /home ext4 defaults 0 2
I created a directory called crypt in my home directory on the SD card and mounted the volume with the following command:
$ sudo mount /dev/mapper/vgHomeDir-lvHomeDir /home/jizldrangs/crypt
I then restored my home directory to that folder, and when I rebooted, I had my old desktop background and all of my files!
Drawbacks
1. I have noticed a performance hit when booting and every so often when browsing the web in Firefox
2. During the installation process, I chose the "random key" option for my swap space, so there is no way to do true hibernation, where the state of the machine in memory is saved to disk and restored later. Suspend, which is where the computer turns off most components and uses minimal power, still works just fine.
The Plan
I knew I was going to take a performance hit, so I got myself an 8 gig SD card. The root of my Ubuntu installation would go on it, with an unencrypted /boot partition on the hard drive as well as a 60 gig encrypted /home partition to store all of my files. The home partition needs its own encryption key, so I decided on a key file that would be stored on the already encrypted root parition, allowing the OS to automatically unlock the home parition and mount it at boot time.
Installation
I downloaded the Ubuntu Alternate Install disk, since the standard install does not include the option to install logical volumes, which are necessary for thinks like encryption or software RAID. The installation process was somewhat involved as you need to manually configure your partitions. There's simply no way around it as your /boot directory needs to be unencrypted (this is because the software that performs on-the-fly encryption and decryption is a kernel module, and it can't be started if it is encrypted). I tried to configure my /home partition on the 60 gig partition on the hard drive like I wanted, but I kept running into weird problems with the installer so I decided to take my chances installing /home on the SD card with everything else and seeing if I could set up /home on the 60 gig encrypted partition later.
So I ended up with /boot on an unencrypted partition on the hard drive, my swap space on an encrypted partition on the hard drive, and the root directory with everything else (/etc, /usr, /bin, /home, etc) on the encrypted partition on the SD card.
Configuration of the /home partition on the hard drive
Less than 8 gigs of space was just not going to cut it for my /home partition, so I was anxious to get the 60 gig encrypted parition configured.
After much Googling, I learned that encrypted volumes in Linux are configured on logical volumes. This means creating a physical parition, configuring it as a physical volume, adding it to a volumne group, creating a logical volume inside the group, and finally installing a file system inside the logical volume, but fortunately a handy program called cryptsetup takes care of most of that for you. Encrypted volumes use LUKS, the Linux Unified Key Setup along with dm-crypt. One of the nice things about LUKS is that it contains 8 key "slots", meaning that you can have up to 8 passphrases or key files, any of which will unlock the volume. This allows me to have a backup passphrase in case I need to reinstall the operating system or the key file goes corrupt.
So I formatted the 60 gig parition with ext4, and then I ran the following to initialize it as a physical volume for use as a logical volume, giving it the name pvHomeDir:
$ sudo pvcreate /dev/sda7 pvHomeDir
Then I create a volume group called vgHomeDir and added that volume:
$ sudo vgcreate vgHomeDir /dev/sda7
I then ran the following line to create an encrypted volume in that virtual group:
$ sudo cryptsetup -y --cipher aes-cbc-essiv:sha256 --key-size 256 luksFormat /dev/sda7
It asked me for a passphrase, which I supplied. When it was finished, I unlocked the new encrypted partition with:
$ sudo cryptsetup luksOpen /dev/sda7 pvHomeDir
I then created a 60 gig logical volume called lvHomeDir in the encrypted parition with this:
$ sudo lvcreate -n lvHomeDir -L 60G vgHomeDir
Then I installed an ext4 file system in the new logical volume (note the name and location of the volume; it is located in /dev/mapper and has the name of the volume group prepended with a dash to the name I gave it):
$ sudo mkfs.ext4 /dev/mapper/vgHomeDir-lvHomeDir
OK, at this point the drive is all set up but it needs that key file so that I don't have to enter in two passphrases every time my computer boots. I create a folder under /usr called keyfile, and copy a picture of myself and my daughter into it, and rename it "file". To add the file as a key to the new partition I ran the following (I'm pretty sure this is the command but not 100%; I'm sorry if it is wrong and please post a comment if this line needs correcting):
$ sudo cryptsetup luksAddKey --key-file=/usr/keyfile/file /dev/sda7
Almost done! The partition just needs to be configured so that it will be used for my /home directory. I edited 2 files:
1. In /etc/crypttab I entered:
pvHomeDir /dev/sda7 /usr/keyfile/file luks,retry=1,lvm=vgHomeDir
2. In /etc/fstab I entered:
/dev/mapper/vgHomeDir-lvHomeDir /home ext4 defaults 0 2
I created a directory called crypt in my home directory on the SD card and mounted the volume with the following command:
$ sudo mount /dev/mapper/vgHomeDir-lvHomeDir /home/jizldrangs/crypt
I then restored my home directory to that folder, and when I rebooted, I had my old desktop background and all of my files!
Drawbacks
1. I have noticed a performance hit when booting and every so often when browsing the web in Firefox
2. During the installation process, I chose the "random key" option for my swap space, so there is no way to do true hibernation, where the state of the machine in memory is saved to disk and restored later. Suspend, which is where the computer turns off most components and uses minimal power, still works just fine.
Saturday, May 8, 2010
Browse securely from a public WiFi connection with SSH
If you are on the road and jump on your hotel's free WiFi be afraid. Be very afraid. Why? All of your network traffic is being broadcasted in all directions with no security protection whatsoever, and it is insanely easy for anyone to read that traffic using freely available tools. Using ARP spoofing it is possible for a snooper to associate his MAC address with the network's gateway, thereby routing all internet-bound traffic through his or her machine. Even SSL is not entirely safe as an attacker can use SSL's renegotiation capability to trick a server into giving the attacker access to your session.
What's a Linux geek to do? Simple: SSH!
Using SSH you can create a secure tunnel from your laptop to your home computer, and pass all of your web traffic coming from your laptop through that connection to your home computer, then out to the internet. It's simple; here's how it's done:
 Now you can browse in peace, and when you are finished simply flip back over to your terminal window and do a Ctrl + C to stop the SSH client. Good luck!
What's a Linux geek to do? Simple: SSH!
Using SSH you can create a secure tunnel from your laptop to your home computer, and pass all of your web traffic coming from your laptop through that connection to your home computer, then out to the internet. It's simple; here's how it's done:
- Before you leave your home, make sure your SSH server is set up properly (see my instructions on how to harden it). We'll say for simplicity that you have configured your SSH server and all of your clients to run on port 1234. That means that your SSH server is listening for incoming connections on port 1234.
- Log into your router's configuration interface and configure it to forward all incoming traffic that arrives at port 1234 to your SSH server's IP address.
- Go to www.whatismyip.com and write down your public IP address. For our example, we'll say that it is 200.200.200.200.
- When you arrive at your hotel, coffee shop, library, etc., pick a port above 1024 to use on your laptop. The SSH client will listen on that port and forward all traffic to your home machine; for our example it will be port 4321.
- Open a terminal and run the following command: ssh -D portNumber
-N publicIPAddress (in our example, it would be ssh -D 4321 -N 200.200.200.200) . If your SSH client is not already configured to use your custom port, add "-p 1234". After you hit Enter, your cursor will move to the beginning of the next line and sit there blinking. This means that the tunnel has been established and it is ready to start forwarding traffic. Leave the terminal open. - Go into Firefox and go to Edit, then Preferences. When the Preferences menu pops up, click the Advanced icon at the top, flip to the Network tab and hit Settings at the top of the screen. That will pop up yet another window. Put the bullet in "Manual Proxy Configuration" and in the box next to "SOCKS Host" enter "localhost", and enter the port you selected in step 4 (in our example, 4321) into the Port box. Below is a screenshot of what it should look like.
- Hit OK, then Close, and restart Firefox.
- Browse to www.whatismyip.com and verify that it detects your home IP address as the one you are browsing from. If whatismyip.com display's your home IP address, you have successfully configured Firefox to tunnel through SSH!

Tuesday, April 20, 2010
Make web apps feel more like native apps with Prism
As I've mentioned before, I'm not crazy about the idea of web apps. I much prefer the control and integrated experience that comes with desktop apps. That's why I tried Prism, and I am loving it.
Prism is a "Site Specific" web browser built by the folks over at Mozilla. They stripped out all of the menus, toolbars, navigation buttons, etc. that you would normally expect from a web browser because it is intended to be used with a single web application per window. You basically give it a URL when you launch Prism, and that window is dedicated to that site. Each web app gets its own window and all navigation is done through the links provided by the app itself.
This doesn't sound like any big deal, but there are several reasons why I like it:
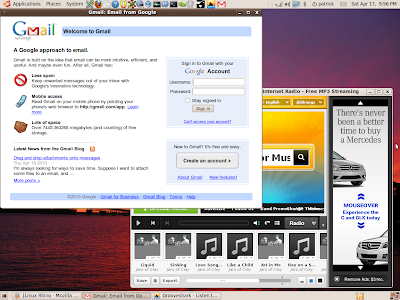
If you like what you see, I recommend that you give it a shot. You can get Prism from the Ubuntu repositories. It comes with a Firefox extension, and you simply browse to the web page and go to Tools, then to Convert Website to Application. That will pop up a window which will allow you to specify the name, URL, and icon of the application. Most of the time that stuff will be filled out for you and all you have to do is check the Desktop button.
Once the Launcher is created on your desktop (unfortunately Prism does not give you the option of specifying where the launcher will be created) you can copy it to your Gnome panel or create a menu item pointing to it.
As always, I have a few caveats to share:
Prism isn't for everyone; it is intended for people who are looking for a certain kind of control over their web browsing experience. Hope this helps!
Prism is a "Site Specific" web browser built by the folks over at Mozilla. They stripped out all of the menus, toolbars, navigation buttons, etc. that you would normally expect from a web browser because it is intended to be used with a single web application per window. You basically give it a URL when you launch Prism, and that window is dedicated to that site. Each web app gets its own window and all navigation is done through the links provided by the app itself.
This doesn't sound like any big deal, but there are several reasons why I like it:
- I am able to reclaim the extra screen real estate (which is especially important on a netbook).
- For web-based apps, I prefer to have a dedicated launcher. If I am trying to check my GMail, I don't want to launch Firefox, wait for my home page to load, then browse to GMail; that is a lot of steps and I can reduce it to one click with Prism. This also allows me to keep my web browsing separate from my web apps. I generally have about 25 tabs open at a time, so with Firefox dedicated to browsing, I can open and close tabs with reckless abandon and don't have to worry about making sure that "special" tab stays open because if I close it I have to sign in again. Let's face it, Firefox can be a little unstable at times, so if one of my tabs is causing Firefox to flake out, it is nice to be able to close and restart Firefox without losing my Grooveshark music or Gmail.
- The extra window is really nice because it gets its own tab in the taskbar. I know that no matter what I am doing, my web app is only a click away, just like every other app. This offers a great window managing and usability benefit. For a while I was listening to Grooveshark inside Firefox, and whenever someone came up to talk to me, I had to spend a painful 5 to 10 seconds finding the Firefox window on my taskbar, waiting for it to maximize, flipping to the Grooveshark tab, and clicking Pause. It is downright rude to keep someone waiting that long while I pause my music, so I welcome the chance to cut down on that time.

If you like what you see, I recommend that you give it a shot. You can get Prism from the Ubuntu repositories. It comes with a Firefox extension, and you simply browse to the web page and go to Tools, then to Convert Website to Application. That will pop up a window which will allow you to specify the name, URL, and icon of the application. Most of the time that stuff will be filled out for you and all you have to do is check the Desktop button.
Once the Launcher is created on your desktop (unfortunately Prism does not give you the option of specifying where the launcher will be created) you can copy it to your Gnome panel or create a menu item pointing to it.
As always, I have a few caveats to share:
- Prism uses the same process name regardless of how many windows are open, so if you create separate launchers and add them to a dock like Avant Window Navigator, it might get kinda confused.
- The Firefox plugins are not available to Prism, so if you are accustomed to the luxury of such plugins as AdBlock Plus, NoScript or any of the thousand other plugins for firefox, you will have to decide how important they are to the particular web app you want to create.
Prism isn't for everyone; it is intended for people who are looking for a certain kind of control over their web browsing experience. Hope this helps!
Sunday, April 4, 2010
Great Linux Games: Extreme Tux Racer
Since upgrading to the beta version of Ubuntu Lucid I've rediscovered a classic Linux game: Extreme Tux Racer. This game features the Linux mascot, Tux, sliding down the side of a mountain, collecting herring, avoiding trees, and going off jumps on his way to the finish line at the bottom. It is a timed race (no other contestants involved), and you can start a campaign and work your way through a series of races or simply "practice" on any track you want.
I absolutely love insanely fast, out-of-control speed racing games such as this (I was a big fan of Star Wars Racer for the Nintendo 64 back in the day), and this is the perfect outlet for me. Trying to keep Tux under control as he is screaming along a half-pipe of solid ice at breakneck speed while collecting herring and racing against the clock is such a blast. The versions that have shipped with the last few releases of Ubuntu have added some great tracks to choose from (I recommend "In Search of Vodka" and "Candy Lane").
There are several other games for Linux that I want to write about at some point, but this is the one I caught myself playing this evening. If you haven't tried it I highly recommend it (it is in the Ubuntu repos and the website is here). Have fun!
From the website:

I absolutely love insanely fast, out-of-control speed racing games such as this (I was a big fan of Star Wars Racer for the Nintendo 64 back in the day), and this is the perfect outlet for me. Trying to keep Tux under control as he is screaming along a half-pipe of solid ice at breakneck speed while collecting herring and racing against the clock is such a blast. The versions that have shipped with the last few releases of Ubuntu have added some great tracks to choose from (I recommend "In Search of Vodka" and "Candy Lane").
There are several other games for Linux that I want to write about at some point, but this is the one I caught myself playing this evening. If you haven't tried it I highly recommend it (it is in the Ubuntu repos and the website is here). Have fun!
From the website:

Sunday, March 28, 2010
The search for the right dock for Ubuntu on a netbook
The beta version of Ubuntu Lucid Lynx became available last week. I usually upgrade at least one of my machines to the beta versions, so I went ahead and did so for my netbook.
The first thing I noticed was that the upgrade removed the Netbook Remix enhancements, and I was looking at a plain vanilla Gnome desktop. This isn't a terrible problem but it does take up extra space and I started wondering if I could do better.
I remembered hearing about several docks available for Ubuntu and decided to give them a try. I decided that I really wanted to see the following features:
With these criteria in mind, I set off to find the best dock. I found this blog posting and basically started going down the list. Docky had a nice-looking panel mode but it wasn't easy enough to use (I couldn't figure out how to add a launcher). Cairo-dock was nice and I almost stuck with it, but it didn't have the nice panel mode I wanted. It was only available in the centered, expanding and collapsing mode, and the only theme that provided indication as to whether the application was already running under each launcher also had the icons growing in size when my mouse rolled over it. So Cairo-dock was close but no cigar.
I installed WBar but by the time I figured out how to launch it, I was already in the process of installing the dock I stuck with, Avant Window Navigator.
Avant Window Navigator (AWN)
To make a long story short, AWN met all of my specifications to the tee. It is quite user-friendly and easy to configure, and the repos contain a lot of great plugins (more on that later). AWN has all of the common options I saw when testing other docks, but also allowed me to configure it just the way I wanted it.
I used Synaptic Package Manager to install the following packages:
It wasn't long before I was totally hooked and ready to abandon the default Gnome panels for good. I right-clicked and deleted the bottom panel without a problem, but when I went to delete the top panel, I noticed that the Delete option was grayed out. I guess they do that in order to stop newbies from accidentally deleting the panel, but I had made an informed decision to get rid of it!
Long story short, here is how to turn off the top panel in ubuntu: hit Alt+F2 and type "gconf-editor". That will pop up a window that looks kinda like the Windows Registry Editor. On the left-hand side, expand Desktop, then Gnome, then highlight Session. On the right-hand side double-click "reuired_components_list". That will pop open a new window. Highlight "panel" and click Remove. That's it! Now the next time you log in you won't have any panels.
Here is what I ended up with. Hope this helps!

The first thing I noticed was that the upgrade removed the Netbook Remix enhancements, and I was looking at a plain vanilla Gnome desktop. This isn't a terrible problem but it does take up extra space and I started wondering if I could do better.
I remembered hearing about several docks available for Ubuntu and decided to give them a try. I decided that I really wanted to see the following features:
- One icon to launch an application or if it were already running, bring the instance of it to the top. With Gnome, you have your launchers at the top and your running programs at the bottom. So if you want to go to a website, you first have to check the bottom of the screen to see if Firefox is already running (which is especially hard with the new Lucid theme, since the tab for the selected window has white typing on a light-gray backround, which makes it almost impossible to read). The thing that first made me interested in exploring the possibility of a dock was the idea that when I am ready to browse the web, I have one icon that will launch Firefox if it isn't open already or bring it to the top if it is already open.
- The one icon needs to have some visual indicator of whether the application is running.
- If I am to switch to a dock, it needs to replace all current panels and menus. That means I want some kind of menu with full access to all of the programs and settings currently in my Applications, Places, and Settings menus. I also need to be able to control my WiFi, see how much battery is remaining, adjust the volume, and shut down from the dock.
- It has to be fast and not too flashy. I've seen some of these docks where the items grow as you hover over them, and I think I would really hate that. When I am trying to click on an icon I do not want it growing or moving around as my mouse approaches it. I also want the icons to be in the same position on the screen all the time, which means that I don't want the dock expanding and contracting as I launch applications (I found out later that a few docks supported "panel mode" which fits this requirement nicely).
With these criteria in mind, I set off to find the best dock. I found this blog posting and basically started going down the list. Docky had a nice-looking panel mode but it wasn't easy enough to use (I couldn't figure out how to add a launcher). Cairo-dock was nice and I almost stuck with it, but it didn't have the nice panel mode I wanted. It was only available in the centered, expanding and collapsing mode, and the only theme that provided indication as to whether the application was already running under each launcher also had the icons growing in size when my mouse rolled over it. So Cairo-dock was close but no cigar.
I installed WBar but by the time I figured out how to launch it, I was already in the process of installing the dock I stuck with, Avant Window Navigator.
Avant Window Navigator (AWN)
To make a long story short, AWN met all of my specifications to the tee. It is quite user-friendly and easy to configure, and the repos contain a lot of great plugins (more on that later). AWN has all of the common options I saw when testing other docks, but also allowed me to configure it just the way I wanted it.
I used Synaptic Package Manager to install the following packages:
- avant-window-navigator (with dependancies)
- awn-applets-c-extras
- awn-applets-python-extras
- python-awn-extras
- Size of Icons: 24 pixels
- Orientation: Bottom
- Style: None
- Behavior: Panel Mode
- Icon effects: None
- Checked the "Expand the Panel" checkbox
- Slid the "Position on the screen" bar all the way over to the left
- Checked "Start AWN automatically"
It wasn't long before I was totally hooked and ready to abandon the default Gnome panels for good. I right-clicked and deleted the bottom panel without a problem, but when I went to delete the top panel, I noticed that the Delete option was grayed out. I guess they do that in order to stop newbies from accidentally deleting the panel, but I had made an informed decision to get rid of it!
Long story short, here is how to turn off the top panel in ubuntu: hit Alt+F2 and type "gconf-editor". That will pop up a window that looks kinda like the Windows Registry Editor. On the left-hand side, expand Desktop, then Gnome, then highlight Session. On the right-hand side double-click "reuired_components_list". That will pop open a new window. Highlight "panel" and click Remove. That's it! Now the next time you log in you won't have any panels.
Here is what I ended up with. Hope this helps!

Monday, March 15, 2010
Follow-up to "Using passphrase-protected SSH keys in Cron"
So I wrote a while back about automating SSH jobs in Cron when the keys were passphrase-protected. I was very excited about being able to automate tasks over SSH and I was sure I had it working but a few days later I realized that it wasn't working at all. It was failing without any error I could see.
I'll spare you the gory details of how many hours I spent and how many things I tried when getting it working. The bottom line is that this evening I realized that when my Cron job or script ran "ssh-agent -s" another ssh-agent process was being created! I figured that that command was simply exporting the environment variables necessary for me to use the process created by the Gnome session (you may remember that I have seahorse set to automatically unlock my ssh key when I log in), but instead I was inadvertently creating a new ssh-agent process with no keys in it. Then when I tried to run Unison, it found the wrong ssh-agent process.
To fix it, I needed to find a way to keep from starting another ssh-agent process, and instead gain access to the one seahorse starts every time I log in. I made a change to my crontab that would search for the existing ssh-agent process ID and authentication socket and import them into the cron environment. This is kind of a hack but it actually works (not like last time). Just add the following to your script before trying to connect to your SSH server (or do what I did and put them right into the cron job, separated by semicolons):
export SSH_AGENT_PID=`ps -a | grep ssh-agent | grep -o -e [0-9][0-9][0-9][0-9]`
export SSH_AUTH_SOCK=`find /tmp/ -path '*keyring-*' -name '*ssh*' -print 2>/dev/null`
I'll spare you the gory details of how many hours I spent and how many things I tried when getting it working. The bottom line is that this evening I realized that when my Cron job or script ran "ssh-agent -s" another ssh-agent process was being created! I figured that that command was simply exporting the environment variables necessary for me to use the process created by the Gnome session (you may remember that I have seahorse set to automatically unlock my ssh key when I log in), but instead I was inadvertently creating a new ssh-agent process with no keys in it. Then when I tried to run Unison, it found the wrong ssh-agent process.
To fix it, I needed to find a way to keep from starting another ssh-agent process, and instead gain access to the one seahorse starts every time I log in. I made a change to my crontab that would search for the existing ssh-agent process ID and authentication socket and import them into the cron environment. This is kind of a hack but it actually works (not like last time). Just add the following to your script before trying to connect to your SSH server (or do what I did and put them right into the cron job, separated by semicolons):
export SSH_AGENT_PID=`ps -a | grep ssh-agent | grep -o -e [0-9][0-9][0-9][0-9]`
export SSH_AUTH_SOCK=`find /tmp/ -path '*keyring-*' -name '*ssh*' -print 2>/dev/null`
Subscribe to:
Posts (Atom)